Showing posts with label diy. Show all posts

September 5, 2013

Sawdust Girl

Hey everyone!  I am very excited to show off my newest project over on Sawdust Girl


Head over over by clicking the link above or picture to learn how to make this super easy Leather Project Journal.

March 25, 2013

We're At It Again

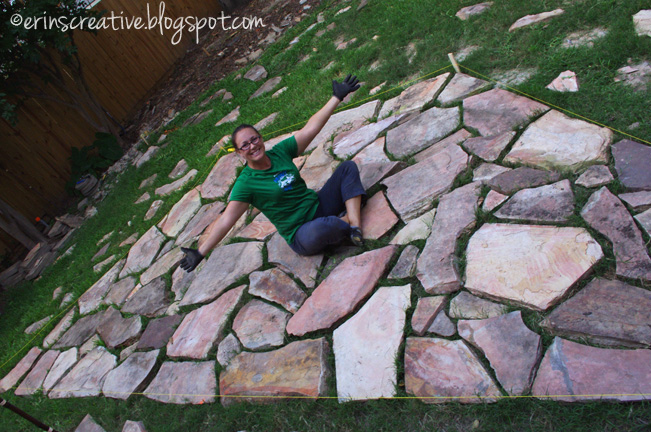
Tis' the season for outdoor improvements.  My husband and I both think that outdoor space needs to be functional.  Since we moved into this house almost 6 years ago, we have been slowly transforming it to be exactly what we want it to be.  Last year brought the biggest changes with our slate patio and walkway. 


Can you believe that we took this nasty mosquito trap and turned it into the patio and walkway without having to buy a single piece of slate? 


After all that hardscaping, we still had slate leftover, and when unearthing all the stone, we also had concrete steppers as well.  We put them to use and took care of a spot in our yard that with every rain storm would do under water and become a lovely mud pit for the dogs.


Can you believe we still have slate leftover?  It's true and I have no idea how we are going to use it up.  I'm sure I will come up with something. 

Now, our next project involves this lovely pile of stone that my husband procured with some hard work and sweat from Lowe's.  They discontinued these, when my husband asked if they had any in stock and was told they no longer carry them, he asked about the ones being used on a display.  Well, they were tearing it down and let my husband help with that process.  YAY!  Free stone! 


Now, I am hoping in the next few weeks our next project will be ready for a reveal.

Anyone else DIYing their landscape?  Like up in the comments if you are, I love to get inspired, especially before it gets to hot to work in South Texas heat.

February 11, 2013

Update on DIY Bird Feeder

I've been wanting to write this post for a while as I have received many, MANY, questions regarding my most popular post from my blog.  I figured I would address as many as I can remember.  You can find the tutorial for this bird feeder here.


Q:  What kinds of birds will it attract? 

A:  I have seen sparrows, cardinals, blue jays, wrens, woodpeckers, chickadees and doves.  The type of bird you will attract depends on the type of feed you use, your location and the time of year.  I change my feed almost every time I fill it. 


Q:  Will it attract squirrels? 

A:  Yes, but they have not been much of a problem for me.  The size of my upper plate makes it difficult for them to get into the bowl.  They typically slide off and fall.  A few times of that and they stopped trying, that was until the lawn mower got parked close enough for them to jump from the handle of the lawn mower into the bowl.  I moved the lawn mower.  On occasion they will scavenge on the ground, but the doves and blue jays like to attack the squirrels.  It's pretty awesome.

Since it's fairly squirrel proof, I am not making squirrels obese.  (Seriously been accused of that, it makes me laugh).

Q:  Will it attract rats and mice? 

A:  I'm sure it could, but that also depends on if they have areas to nest.  The feral cat population and the fact that I have two dogs has made sure that rats and mice have not been a problem.

Q:  Does the type of drill bit matter?

A:  YES!!!  If you are doing this to ceramic plates, you need a specialty bit to cut through glass/ceramic.  If you are cutting through plastic or melamine (mine was done with melamine) a standard HSS drill bit will do.  Please use my trick and place a block of wood underneath to help with blow out/chip out. 


Q:  Do you need drainage holes? 

A:  I haven't needed them.  My bird feeder is under a covered porch.

Q:  Do the birds poop in the bowl?  How often do you have to clean the bowl?

A:  In my experience, not yet.  I have only taken down the feeder twice to clean it.  They keep it fairly tidy.  More often than anything, I need to tip the bowl over to get rid of some of the seed husks, if I forget, the sparrows are more than happy to throw them out, then I just need to sweep them up off the porch.

Q:  Will this stop birds from migrating?  Will it make them dependent on the feeder?

A:  NO!  There is a great Q&A from the experts themselves over at Cornell University's Ornithology Department about those very questions and others.  They even do a backyard bird count to track birds every year.  Check out Project Feeder Watch.

Q:  What is the downside of having the feeder?

A:  The birds like to hang out on my patio table and they do poop on that and the chairs.  We eat outside so infrequently that I thoroughly wash the chairs and ta ble (and disinfect it) before eating off of it.  You know what though?  They still pooped on the table and chairs before the bird feeder, it just happens more frequently now. 

Q:  What do you like most about your bird feeder?

A:  I love my little Carolina Wren that comes to inform me when the feeder in empty.  I get some pretty loud chirps right at my kitchen window in the morning when the feeder is empty.  The wren will even watch me do the dishes sometimes.  It's really neat.


If I inspired you to create a bowl and plate bird feeder I would love to see photos of it!  I would love to feature your bird feeder with your name and a link to your blog (if you have one).  You can e-mail me.  erin.morey@gmail.com

Also, did I miss any of your questions?  Leave them in the comments below and if there are enough, I will do another Q&A post.   Thanks for all your love for my bird feeder!  I love it and hope you created one and love it too!

December 31, 2012

My favorites of 2012

I did a whole lot of creating in 2012.  I have compiled my top 5 6 (I couldn't narrow it down to 5) to share with you, in case you missed any of them.

In no particular order:


An awesome project creation that I made for my son's preschool auction.  I bought it back, I was so happy and proud of it that I just couldn't let it go.  It was also the perfect bookshelf to hold all the odd shaped kids books we have.


This has been my only craft to really go viral.  It's been pinned thousands of times, ripped off and posted in more languages than I can recognize and also received the most scrutiny (apparently I am making squirrels obese with it).  Either way, I love it, I get to see some of my local wildlife, squirrels realized quickly that their success rate in getting into the feeder was not high enough and I haven't had a squirrel in there in about 5 months.  I've made a few as gifts for others that love watching/feeding the birds as much as I do.  It's funny to think that my 15 minutes of crafting fame is  a bird feeder made from cheap melamine plates I bought on clearance at Target.


I have been doing lots of free online tutorials to better myself in Photoshop.  Even after 14 years experience using the program, there is still a lot more to learn about it.


This was definitely the year to improve our back yard.  This stone patio was the major undertaking and I am still very pleased with it.  Now if we could only figure out a really good way to get rid of mosquitoes and we would be all set.


This was created for SYTYC.  It was the first piece I created that felt like fine art to me.  I love how it turned out and I was able to play with a few new techniques (like dying wood). 


 This was my finale piece for the SYTYC competition.  It is still hanging in my entry way and I love it just as much today as when I first completed it.  It holds a serious sense of pride for me.  I cannot believe that I built it in 4 days!  I also am elated that it was the piece that got me first place in the competition.


October 5, 2012

Epic Battle: Erin vs. Mr. Roper

If you remember, not too long ago my dryer stopped producing heat.  I changed out the heating element myself.  YAY!  Then I had a functioning dryer.  You can read all about it here.

p.s. If you didn't read my previous post, Mr. Roper is my dryer.


Well, Mr. Roper was a sneaky jerk.  I was two loads into doing my weekly laundry (which consists of about 5 loads).  I got busy and the laundry sat in there a while longer than it should have.  So, I go to *fluff* the laundry by running the dryer for another 10 minutes and nothing happens.  NOTHING!  It worked a couple hours ago.

I went to my favorite site to diagnose problems with my dryer.  Part Select.  Put in your model number, add your problem and it gives a list of things that could be wrong and with many of them, and sometimes a video on how to fix it.  YAY!

I'm going to go on and say that I really did not document this well.  If you watch the video clips that I place on this post, you can pretend that is me.  If you really want to believe it's me, in your head make him a woman who is swearing like a trucker.

So I did the diagnostic on my dryer.  I started with the start switch (even though it was unlikely that this could be the problem).  I mostly picked it because it didn't require a lot of work to get to.

Start switch from the inside of my dryer.

I am going to leave the explanations to the experts on how to remove and test it.


Looks easy doesn't it?  It ended up being my start switch.  The problem, NOT a single place in ALL of Houston carries the part, because this is the part that doesn't break.  Yeah...great!  I had to wait a week for it to come in the mail.

Finally, FINALLY it came.  I replaced it and my dryer worked.  IT WORKED...

FOR TWO FREAKING SECONDS!!!

I'm completely serious.  At this point, I think I had gone a little crazy.  Okay, maybe a little more than crazy.  Think crazy like Bill Murray in Caddyshack when dealing with the gopher.  The thoughts running through my mind definitely involved possibly blowing up the dryer.  The small rational section of my brain fought it's way forward and I decided to be logical and figure out what just broke.

I have a small confession.  The part that broke this time, well...it was already broken.  The door switch, you know the one that allows the light to turn on and off, that has been broken for years.  It was broken in such a way that the light just never turned on and my dryer would continue to run if the door was open.  Not a big deal.  Well, the jostling of the dryer starting back up was enough for this to go even more screwy.  It now thought that the door was open when in fact it was closed.

Door switch from the inside of my dryer.

Thankfully parts places actually carry the door switch.  What I'm really thankful for, it's easy to replace.  Again, I'll leave it up to the professionals to show you how easy this is. 


I now closed up the dryer, crossed my fingers and hoped like crazy that it would not just start, but continue to run.

It did.  Take that Mr. Roper!  I think I have come out on top in this battle once again.

Now, I have had a lot of people ask me why I just don't go and buy a new dryer.  Well, the dryer in the course of the last 9 years has had to be repaired four times.

Belt - $17
Heating Element - $66
Start Switch - $31
Door Switch - $20

$134 spent on fixing my dryer over the course of 9 years, plus the knowledge that I have gained is worth the dirty clothes laying around while waiting to fix it.  Also, I love that I have a dryer that can dry a load of jeans in an hour. 

My husband loves that I can do this so much he surprised me with a rose when he walked in the door after work.  How I love that man!


So, has anyone else tackled home appliance repair themselves or am I just crazy?

August 3, 2012

DIY Cufflinks: Tutorial


It so much fun coming up with new cufflinks for my husband.  The fact that I could use it as an entry for So You Think You're Crafty makes it all the better. 

Have you seen the price of a pair of cufflinks?  The price tag, huge!  It's hard to find a decent pair for anything less than $50.  When I discovered that you could buy the blanks to make your own, I jumped all over it.  I bought two bunches of the blanks, the flats and the recessed cufflinks.

All of them were very easy to make.  Each pair I did use E-6000 glue, I will break down everything else that was used for each pair.

I will start with the baseball cufflinks.  Needed is a pair of recessed cufflinks, your glue, a marker, scissors and a utility knife.


Place your cufflink on top of the ball face down, mark around your cufflink.


Cut out your circle with your utility knife.  Once cut, take the edge and peel up your circle baseball pieces.  They are glued down, but it didn't take much to get them to come up.  You will need to trim up the edge a little bit as they will be over-sized.  Cut a little at a time until you get the perfect fit.


Place enough glue to cover the bottom of your cufflink, then place your baseball circles in there, taking special care to make sure that your stitches do not pop up.  Once the glue is dry, gift them up for your husband/dad/uncle, etc.


The golf cufflinks are a little more complicated, but very doable.  You will use all the same items that you did for your baseball cufflinks, but will need to include a bandsaw and sand paper.  Your initial cut will be made with the bandsaw.  Make sure you make your cut based on depth, not on diameter.


Once your cut is made, mark your circle from the cufflink in the center of your cut.  Either cut it out with a utility knife or scissors.  Once you get it close, you will want to shave the edges down with your sand paper.  I used 150 grit sandpaper.


Once you have them sized to fit your recessed cufflink, layer it with some glue and place it in.  Clean any glue that might seep up from the side and once dry, gift them up!


The fishing cufflinks required flat cufflinks, glue and the bandsaw.  I cut the diameter of the bobber to match the top of the cufflink.  Then I glued it down. 


That is it!  Easy peasy!  The only simpler one was the lego cufflinks.  All that required was a flat cufflink and glue.


In all seriousness, each pair of cufflinks broke down to less than $3.  That's for the pair!  Take that stuffy men's store that overprices these things!

Is anyone out there in blog land going to be making some cufflinks?  Is my husband the only one that wears them?  Any good ideas for some fun quirky ones that I haven't made?

Sharing this over at:
Tater tots and Jello - Weekend Wrap Up Party

June 14, 2012

DIY Bird Feeder

I am so excited to be competing in So You Think You're Crafty and even more excited and honored that my audition craft took first place.  Now, I am going to show you how to make your own.


There isn't a whole lot of supplies that you need for this. 


  • Drill and standard drill bit (if you are choosing to use a melamine bowl and plate like I did) 
If you want to use ceramic or porcelain bowls and plates, buy a drill bit designed to drill them
  • Bowl and Plate (mine came from Target at less than $2 each)
  • Large carriage bolt, I used 10"x 5/8"
I would have used an eye bolt if I found one of the size I needed, but I didn't, so I couldn't
  • Three washers that will fit your bolt
  • Three nuts that will fit your bolt
  • Glue (I like to use CA glue)
  • If you use a carriage bolt like myself, you will also need some nylon cord
The trickiest part of making the bird feeder is drilling your holes.  Plastic has a tendancy to crack, chip and break.  I will show you how to avoid that.  Take a block of scrap wood and place it directly under where you are drilling. 


Even with the block of wood, because the bowl and plate isn't perfectly flat, you might have a bit of chipping, but that shouldn't be a problem.  You are just trying to avoid cracking the plate or having a large blow out.


See, even mine chipped.  Not a big deal, it won't be seen.  Once you drill the holes in the center of your bowl and plate, it's time to assemble your piece.

Place a washer on your bolt and then bring your bolt up through the bottom part of your bowl.


It will be very wobbly, so you will need to sandwich the washers around the bowl with glue.  The order goes, washer, glue, bowl, glue, washer.

Then you will take a nut and thread it a few inches down.  Your plate will sit directly on top of this nut.


Place your plate on the nut, then thread another nut so that the plate sits between the two.  Hand tighten them so your plate doesn't move, but not so hard that you crack the plate.

Then place another washer and another nut on your bolt.  This step is only necessary if you used a carriage bolt like I did.  If you found a large eye bolt, your assembly will be in reverse.


I will show you the the reason for the stacking of the nuts and washers on the top.  Did you ever do make lanyard keychains/bracelets out of the plastic cord as a kid?  I hope so, because that is how you are going to make your loop.  So, cut yourself two pieces of nylon cord about 2 feet long each.

First, tie a simple overhand knot (the first knot you make when tying a shoe) with each piece of cord.  Make sure the knot is around the middle of the cord.


Then you start doing a lanyard knot (technically called a crown sinnet knot) over the top of the washer, but make sure your overhand knot stays tight while doing so.  If you aren't comfortable with your overhand knot, glue it before proceeding to your crown sinnet knot. 


I found a great animation on how to do the crown sinnet knot...so if you don't understand how to do it, please visit Animated Knots by Grog to check it out.


Once you have created a few inches of the crown sinnet knot, take two strands of cord and make some loops like so.  You will then take your two remaining strands of cord and tie an overhand knot around the base of your loops.


Pull it very tight.  You don't want it to come loose.  Then, cut the excess cord off.  Cut close to the base of your knot


You will need to burn the ends of your nylon cord.  This will cause it to melt and expand a little.  This will make sure your cord doesn't unravel and your knots won't come out.  The above photo shows burned cord ends on the right, and unburned ones on the left. 

All you have left to do is go fill your bowl with bird seed, hang it outside and wait to see what feathery friends come to visit.  It took less than a day for my first feathery friend to discover the new bird feeder.  Once that happened, I've had regular visitors ever since!


I hope you create your own bird feeder.  I would love to see pics of any you make!  If you have any questions, please feel free to ask.

Sharing this over at:
Momnivore's Dilemma - Creative Juice  
Sew Many Ways - Sew Darn Crafty 
Not Just a Housewife - Show Me What Ya Got

June 11, 2012

SYTYC and a Sign

I am so honored to announce that my bird feeder (yup, I did the bird feeder) took first place in the audition round!  There were a lot of great crafts that I was competing against, so I am blown away that my craft was first.  How do I follow up?  I'm a little nervous now and racking my brain on what to do next.

Well, I will try my best through the competition and hope you follow my journey in doing so.  You won't see my week one craft for a couple weeks as the final week of the current season will continue at So You Think You're Crafty.  Go check it out!


I will post the full tutorial for the bird feeder on Thursday.  I hope it will answer any questions that you might have.

Now for the sign.  I was contacted by a friend of mine with a request for a sign that she saw on etsy.  I took that as my inspiration and mocked up the sign in photoshop.  Once I got the approval, I moved forward with painting and the lettering.  I think it turned out beautifully.  I used an acrylic transfer technique found all over the web.  I would point you to my original source, but it no longer exists. 


My friend is the maid of honor for a wedding and wanted to present this to the bride-to-be at the wedding shower.  The bride-to-be loved it and even the groom approved.  My husband now would like one to hang on our wall.  Maybe then we could actually remember what day we were married.  It only took us 4 years to get it right!  seriously not kidding...we are so terrible!  Hopefully the soon to be newlyweds will have better luck remembering their wedding date when their anniversary rolls around!  :)

You Might Also Like

Related Posts Plugin for WordPress, Blogger...