Showing posts with label tutorial. Show all posts

November 25, 2013

DIY Hat Rack

When we enter into the Holiday Spiral, I realize that we have too much stuff and not enough organization.  My husband and I never grew up knowing how to organize too much as we moved a lot.  When you move a lot, you get to go through your things and throw out/donate/garage sale anything you don't want to move/forgot you had/or had no recollection of where it came from.  I have lived in over 20 different houses/apartments, so being in the same house for over 6 years, the clutter is starting to take over and I am on a mission to get rid of quite a bit and organize the areas that are driving me crazy.  Our front closet it one of them, which is why I made this.


I can't take credit for this idea.  My grandfather started making these probably before I was even born.  He had quite a few in his house and we had some growing up.  Why I haven't made them before now, I cannot say, but feel like an idiot for not doing it sooner.  My husband and I both have quite a few hats we refuse to part with and most were all hanging out at the top of the hall closet.  They needed to be organized and not take up a lot of space.


You will need a board, the one I used was a 1/2x2x36, wooden clothes pins and wood glue.  That's it.  I had all of these around the house so it made this project FREE!  Who doesn't love a free project that helps organize your house?

You will need to sand your board.  I sanded mine down to 120 grit.

Apply glue to the back of a clothes pin.


Press it onto your board making sure it is centered.


I was able to put 8 clothes pins on a 3 foot board.  My spacing was 1 1/2 inches at the top and bottom, then 1 inch between each clothes pin.

Let the glue dry, then screw this to the wall and you have an easy and very cheap (or free) way to calm the clutter of hats that couldn't have been living in just my closet...right?


Now I just need about 4 or 5 more of these.  Not kidding, we like our hats around here.

July 22, 2013

Make Your Own Washi Tape

I have jumped all over the washi tape craze, but sometimes, the cost is a little much.  On the wish list for my birthday, I asked for white artist tape for the sole purpose of decorating it.  Thanks to my awesome hubby, he got me everything on my wish list.


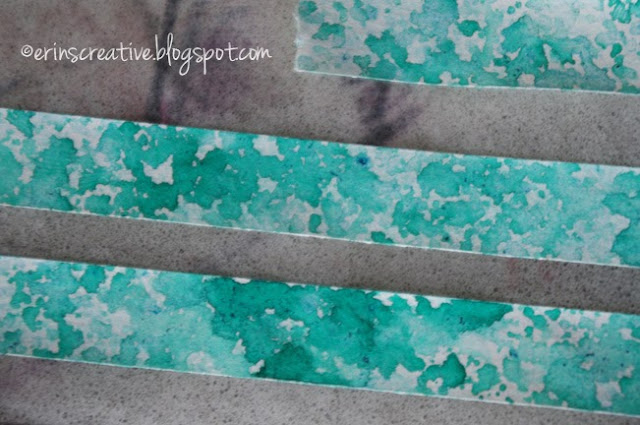
If you want make your own washi tape, take strips of the artist tape and place it on the wax paper.

For what I wanted to do, I used a mini mister, india ink (or liquid water color) and water.  For the black, I filled my mister up 1/4 of the way with water and added 15 drops of india ink.  I sprayed the tape and let it dry.  As my son Maben would say, "Easy Peasy Lemon Squeezy!"


India ink is waterproof, so once it's dry, you shouldn't have to worry about it smearing.  For the colored tape, I used liquid water color the same way I did the ink.  I used the liquid water color because it is what I had, but if I wanted it to be more durable, I would have gone out and bought colored india ink.

How gorgeous is this watercolor?  Love it!

I used the tape to attach some photos and feathers to the side of my metal supply cabinet that is in my art/craft room.


Have any of you ever decorated your own washi tape?  Want to try it now?  I can think of a few more ways to decorate some white artist tape.

Markers, stamps, splatter paint, ect.  Hmmm, maybe I need to do another post with all these ideas.

Sharing this over at:
Sugar Bee Crafts: Take-A-Look Tuesday 
Not Just A Housewife: Show Me What Ya Got #130

June 12, 2013

How To: Messy Line Drawings

I love, Love, LOVE messy line drawings.  I have been working on perfecting my technique for this and have found such an EASY way to get this look and I will show you how.


First, with either a Cricut, Silhouette, Cuttlebug, etc...start with a die cut.  I have been working on trying to catch up in my scrapbooking and I needed a train, so that's what I used.  Aside from a die cut, you will also need a marker.  I used a 03 (which is approximately 0.35mm thick) prismacolor art pen.  I have done this with fine point sharpies too, but you would need a larger die cut since it creates a thicker line.


Look at your die cut and think about the shapes.  Everything can be broken down into shapes and lines.  Then start with one outline.


When you start drawing your shape/outline again, it doesn't have to be perfect.  The more imperfect it is, the better it looks. 

Keep repeating this same process all over your die cut and once you are done, you have a perfectly messy line drawing that you are going to love!


January 9, 2013

Marker Caddy

For those of you with kids, don't you hate it how your kids lose marker caps?  I swear I can sit there watching them color and they lose the caps.  This marker caddy fixes that problem and it is incredibly easy to make.


I got this idea from my grandfather.  He use to make them for all his grand kids and also use to sell them in craft fairs.  I made a few changes, his was round, I took the easier way out and just used a 2x4.


You will need a package of washable markers, E-6000 glue, a 9/16 inch HSS drill bit, an untreated pine 2x4, sandpaper and your choice of a non-toxic finish.  I used furniture wax. 

Cut your 2x4 down to 8 inches.  Use a ruler to mark off your spacing of where you will place your holes for the marker tops.  I made a template in Photoshop.  I am sharing it with you, but please only use it for personal use.   Drill, your holes where the lines cross.  Sand your wood to 220 grit.  Then apply your finish, making sure not to get too much into the holes.  Glue your markers in and let the glue cure for 24 hours. 


It's a very easy project that doesn't take very long at all.  I do them assembly line style and can knock out quite a few so I have some around when I get the last minute birthday invite.  I usually pair it with a drawing pad.


And best of all...no more lost caps!


Once a marker dries out, replace that marker and don't worry about the cap because it isn't going anywhere.  Just be aware that some small hands have a hard time snapping the marker down tight until the caps are broken in.  So at the end of a color session, just make sure all the markers are seated tightly in their caps so the markers don't dry out.

Linking up at:
Sew Many Ways: Sew Darn Crafty Linky Party
Sugar Bee Crafts: Take A Look Tuesday
Sugar Bee Crafts

November 14, 2012

Paper Costume: Tutorial

Maben's school does a vocabulary parade.  It's really fun as each grade level is given different parameters of how they need to choose their word and dress up as it.  For Kindergarten it's pretty easy, their word needed to start with a consonant.  Maben's first idea was to dress as the word, "was."  Yeah, not happening, so he chose, "is."  I explained that he should pick a noun, like paper.  "Okay mom, I want to be paper."  (face palm) 


Since it was my awesome idea, I needed to deliver.  I decided to transform a plain white t-shirt into a piece of notebook paper with a doodle on it.  It's fairly simple and I had all things on hand.

You will need a t-shirt, a ruler and a red, blue and black fabric marker.


I used the ruler to draw a straight line and use as a spacer for the lines on the paper.


Seriously a very easy project.  The most difficult part was to freehand the paper airplane doodle.  I actually made a paper airplane as a reference for my doodle.


Tip that I learned, it's easier to use a soft touch when drawing with the markers to prevent the marker from catching and dragging since the shirt is stretchy.  So, I drew lightly and just went over it a few times.

I heat set the fabric markers in the dryer for 30 minutes on high.  You could do that or run an iron over each spot for 4 minutes.  The dryer was easier.

Maben loves his paper shirt.  He was so incredibly excited to see it for the first time and was probably the most originally dressed up kindergartener.


Most of the kids recycled their Halloween costumes, which I can't blame the parents since our district does not allow dressing up for Halloween.  So, lots of princesses, firefighters, fairies and super heroes, but only one kid dressed as paper.  I couldn't be prouder!


Linking this up at:
Tatertots and Jello: Weekend Wrap Up Party
Sew Many Ways: Sew Darn Crafty Linky Party 
So I Married A Craft Blogger: Man Up Link Up

September 7, 2012

Arts and Crafts Mirror Tutorial

I wanted to let everyone know that in case you missed it, the Arts and Crafts Mirror Tutorial is posted over at So You Think You're Crafty. 


August 29, 2012

Hand Turned Wood Bracelet


Hey everyone!  The tutorial for my Hand Turned Wood Bracelet was posted yesterday over at So You Think You're Crafty.  You should go check it out by clicking HERE.

August 18, 2012

Test Tube Vase: Tutorial

Building the Test Tube Vase was quite easy and came together quickly.  You will need to find test tubes in order to do this build, Amazon has quite a few to choose from.  I understand not everyone will be able to find them at a thrift store, but it's awesome to know that there is such a wide selection out there.  You know, in case I decide to make some for gifts.

Not all test tubes are the same size, so when drilling holes, please keep in mind that what size drill bit I used, may not work for you.


After you acquire your test tubes, you will need two boards.  One for the base, one for the arch.

My Base: Curly maple, exact dimensions 14 x 3 3/8 x 11/16"
My Arch: Bass wood, exact dimensions 15 3/16 x 4 x 1/16"

The curly maple was leftover laying around the garage from a project my husband did and I picked up the bass wood at Hobby Lobby, it's mixed in with the balsa wood for building airplanes or doll furniture.


I came up with the length of the bass wood based on trial and error.  Not every piece of wood will bend the same way, so I cut the grooves in the maple first.

I set up the table saw at a 45 degree angle and marked in 3/4" from each edge.


I then ran it through the table saw to cut the grooves.  I used a miter sled (shown above) to make sure that I cut my groove straight.  I set the saw up to only cut 3/8 deep.


Once the grooves are cut, play with the bass wood to get the right length for your arch.  Once you figured out your length, you will need to mark where you want your test tubes to sit.  I started by marking the center of the bass wood and I set mine 1 3/4" apart. 

I used a 1/2" HSS (high speed steel) drill bit, even though my test tubes were larger than that.  I have larger drill bits, but not the right type and I didn't want to risk splitting the board.


After drilling the holes, I traced the mouths of the test tubes and took a round file to rough out the holes to the correct size.  The holes on the outside need to be made into a slight oval, because of the bend.


To get the perfect fit, it's all trial and error.  Keep setting your arch into your base board and try inserting the test tube until you get the right fit.


Once you have what you think is the right fit, take your piece (just like the photo above) over to your drill press.  

Your holes will be larger than your drill bit, so center your drill bit and set your stop.


The stop is shown above.  The holes you are drilling is so that the test tubes have a place to set without slipping around.  I set my stop up to stop my drill bit from going any further than 1/8" deep.


Once you are done with the drill, take your base and arch apart.  I hand sanded the arch and used the oribtal sander to sand the base.  I took it to 220 grit sand paper.  


I then stained and dyed my pieces.  You can take a look at all the dying fun right here.  The staining of arch needed only one coat on each side.  The basswood soaked it all in very quickly and evenly.


I did a shellac finish on both the arch and the base once the dye and stain dried.


In order to the apply the shellac, I use a process that my husband showed me.  You will need some batting, a lint free rag and a binder clip.  Our rag is an old white t-shirt.  Place the batting on top of the rag.


Wrap the batting inside the rag, then attach the binder clip to hold it all together.


The binder clip also provides a nice handle to hold onto.  I did quick thin layers of the shellac, making sure that they were completely dry between coats.  I also buffed it up between coats with some fine steel wool.


Once the shellac was completely dry, I took a new, clean rag and applied a Renaissance wax finish on top.  It's not the cheapest stuff, but the quality is amazing and you do NOT need a lot to get the best results.  It helps protect pieces from dust, fingerprints and liquids.  

Once you have completed your finishing process, put the arch back in the base, insert your test tubes and add some flowers and water!  Then marvel at the beautiful piece you made.


Sharing this over at:
So I Married A Craft Blogger: Man Up Link Up II
Sugar Bee Crafts: Take-A-Look Tuesday

You Might Also Like

Related Posts Plugin for WordPress, Blogger...