My husband and I took advantage of the long weekend and finally tackled a large project that we have been meaning to get to for a long time. We FINALLY built the stone patio that we wanted. Ta Dah!
Now for you to understand the full feeling of relief, I have to give you a little history. The spot in which my husband and I are sitting use to be a fish pond. Probably a magnificent one in it's hay day. The only photo of the pond I could find was the one from when we bought the house.
Now, I have to say, this photo was taken probably long before the house was ever on the market. When we moved in, the pond liner was ripped, so it would only fill half way (it was about 3 1/2 feet deep), the electricity to pump and filter was not functioning, so it was a giant mosquito trap that no matter how much mosquito killer stuff I put into it, it didn't matter. So, since I had to regrade the flower beds in the front yard, I filled it in with dirt.
So this is pretty much what it looked like for the past few years. We decided to take all the stone that was used for the fish pond and make it a patio. What we didn't expect, HOW MUCH STONE WAS THERE!!! In some spots, we dug up three layers of stone. We have enough stone to do a full walkway from our covered patio near the back door out to the stone patio and then some.
We cleared the area, staked it out and invited over our friend Lex to help. Meet the help! Hubby and Lex.
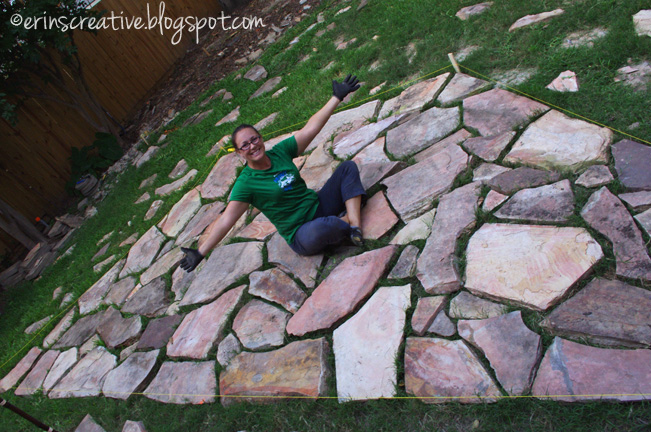
Friday afternoon/night, Matt marked out in the lawn the shape of the patio so I could use my mad crazy awesome tetris skills to layout the stones, so we would have some idea of how to piece it all together when it came time.
I moved most of those stones by myself. I can't believe I could lift half of those!
Saturday, Matt and I spent the morning running around and doing our typical weekend chores, like grocery shopping and picked up some last minute supplies. Then in the afternoon, Lex showed up and we all started working. Most of the work was done Sunday.
I labeled all the stones with chalk. I numbered them and made orientation lines, so when moving the stones from our mock patio to the real patio, we would know how they went. It worked fairly well.
While I did that, the boys leveled the patio area, rented a plate compactor to level out the soil. Added decomposed granite and plate compacted it again. Then it was my show. We added our layer of sand and I played tetris with all our stones. I had to make a few adjustments, but all in all, not bad!
By mid-morning on Monday, all the stones were set in sand. We had accomplished all the hard tasks. Now we just needed mix up a sand and soil mixture to sweep between the stones.
Normally you would just use sand, but we were planning on putting stepable herbs between some of the stones. They need some nutrients.
For the stepables, we picked up lemon thyme, lavender thyme and corsican mint. They all smell heavenly! The added bonus, the mint is suppose to help repel mosquitoes!
Before I planted the herbs, I swept my mixture into all the cracks between the stones and watered it in. Then I planted the herbs, added more mixture to sweep in and watered it down again.
I planted the mint under where the firepit table and chairs would be because it is the lowest growing. Both thymes were planted on the edge, because it can grow up to around 6-8 inches. The guy from the garden center told me that if it got too high we could just mow it. Awesome!
And now it was done! We kicked back, enjoyed a beer and relaxed at a job well done, that was finally done!
We have some plans for a few more decorative touches around the new patio. One of the first on the list, to fix that walkway and get it to match!
(p.s. if you look at the fence in the last pic under the Texas flag, that is most of the stone we have left over, it's a lot!)
Sharing this over at:
One Project Closer - Before and After Series